The Honeywell T4 Pro Programmable Thermostat offers efficient temperature control for residential and light commercial settings. Designed for user-friendly operation, it ensures optimal comfort and energy efficiency. Proper installation is essential for smooth functionality and long-term performance.
1.1 Overview of the T4 Pro
The Honeywell T4 Pro Programmable Thermostat is a cutting-edge device designed for efficient temperature control in residential and light commercial environments. It offers a user-friendly interface that simplifies programming and operation, making it ideal for both professionals and DIY enthusiasts. The T4 Pro features advanced scheduling options, allowing users to customize weekday and weekend settings for optimal energy efficiency. With its sleek design and compatibility with various HVAC systems, this thermostat ensures precise temperature management. The package includes the T4 Pro thermostat, UWP Mounting System, decorative cover plate, screws, anchors, and 2 AA batteries. Its energy-saving modes and smart home integration capabilities make it a versatile choice for modern households. This thermostat is built to provide long-lasting performance and comfort, ensuring a seamless experience for users.
1.2 Importance of Proper Installation
Proper installation of the Honeywell T4 Pro Programmable Thermostat is crucial for ensuring optimal performance, energy efficiency, and safety. Incorrect installation can lead to malfunctioning, reduced efficiency, or even safety hazards. Always turn off the power at the breaker box before starting the installation to avoid electrical risks. Ensuring the UWP (Universal Wall Plate) is level and securely fastened is essential for accurate temperature sensing and smooth operation. Improper mounting or wiring can result in uneven heating, incorrect temperature readings, or system failures. Following the step-by-step instructions provided in the manual guarantees a safe and efficient setup. Proper installation also ensures that all advanced features, such as energy-saving modes and smart home integration, function as intended. By adhering to the installation guidelines, users can enjoy reliable performance and maximize the thermostat’s energy-saving capabilities.
Pre-installation Steps
Before installation, verify the package contents, prepare the site, and ensure the power is off at the breaker. This ensures a safe and organized setup process.
2.1 Checking the Package Contents
Begin by carefully examining the contents of the T4 Pro package to ensure all components are included. The package should contain the T4 Pro Thermostat, UWP Mounting System, Honeywell Standard Installation Adapter (J-box adapter), Decorative Cover Plate, screws, anchors, 2 AA batteries, and the installation instructions and user guide. Verify each item against the packaging list to avoid missing any essential parts. If any component is damaged or missing, contact the manufacturer or supplier immediately for assistance. This step is crucial to proceed smoothly with the installation process and ensure all necessary tools are readily available. Proper preparation now will prevent delays or issues later.
2.2 Preparing the Installation Site
Before starting the installation, ensure the site is ready. Turn off the power to the HVAC system at the breaker box or switch for safety. Remove the existing thermostat and inspect the wires for any damage or corrosion. Clean the area around the installation site to prevent dust or debris from interfering. Ensure the wall where the UWP will be mounted is structurally sound and free from obstructions. For drywall, check if anchors are needed for added support. Gather all necessary tools and components from the package, such as screws, anchors, and the UWP mounting system. Layout the items neatly to streamline the process. This preparation ensures a smooth and efficient installation experience.

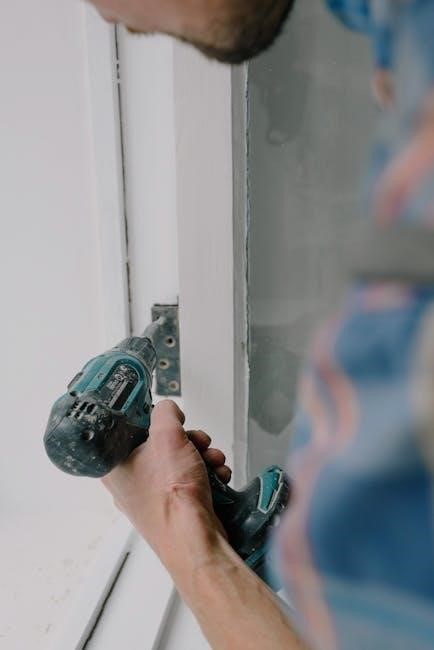
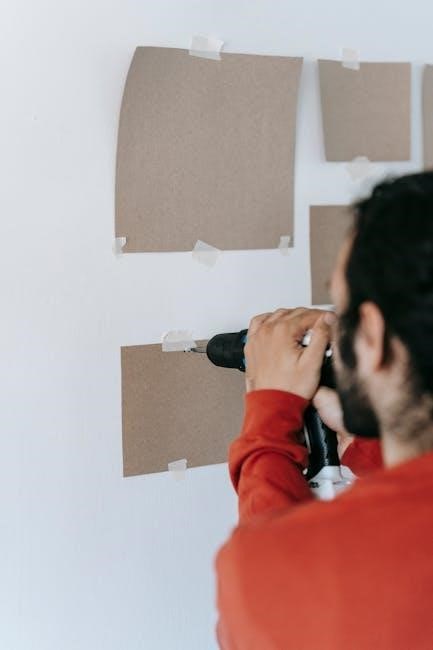
Mounting the UWP
Mount the UWP by leveling and marking the wall. Drill holes, insert anchors, and secure the system with screws. Ensure stability for proper thermostat function.
3.1 Leveling and Marking the Wall
Begin by positioning the UWP on the wall, ensuring it is level. Use a leveling tool to confirm proper alignment. Once leveled, mark the hole positions where the screws will be inserted. These marks will guide accurate drilling. For drywall, drill 7/32-inch holes at the marked locations. Lightly tap the supplied wall anchors into place using a hammer. Ensure the anchors are secure to support the weight of the UWP. Proper leveling and marking are critical for a stable installation, preventing any tilting or uneven mounting of the thermostat. After marking, proceed to drill and secure the anchors, ensuring the UWP is firmly attached to the wall.
3.2 Drilling Holes and Securing the UWP
Using a 7/32-inch drill bit, create holes in the wall at the marked positions. For drywall, this size ensures a precise fit for the wall anchors. After drilling, lightly tap the supplied wall anchors into the holes using a hammer until they are flush with the wall surface. Next, align the UWP with the anchors and insert the 1-1/2-inch screws through the mounting holes. Tighten the screws firmly to secure the UWP to the wall. Ensure the UWP is straight and stable. Before finalizing, double-check that all wires are properly routed through the wiring hole to avoid pinching or damage. Once secured, the UWP should be level and firmly attached, ready for the next installation steps.
Wiring the Thermostat
Connect the wires to the appropriate terminals on the thermostat. Ensure the Rc terminal slider is in the correct position. Verify all connections for accuracy and consult the manual or a professional if unsure.
4;1 Connecting the Wires to the Thermostat
Before connecting the wires, ensure the power is turned off at the breaker box. Match the wires to their corresponding terminals on the thermostat, following the label guide provided. For the Rc terminal, slide the tab down if using a two-wire system. Secure each wire firmly to prevent loose connections. Double-check the wiring diagram in the manual to confirm compatibility with your HVAC system. If unsure, consult a professional or the Honeywell support resources for clarification. Proper wiring ensures safe and efficient operation of the thermostat.
4.2 Handling the Rc Terminal
The Rc terminal is crucial for powering the thermostat. Set the slider to the down position if using a two-wire system. For systems requiring constant power, ensure the slider remains up. Note that slider tabs for U terminals should stay in place for T4 Pro models. Incorrect settings may cause malfunctions. Always refer to the wiring diagram in the manual or Honeywell support for guidance. Proper Rc terminal configuration ensures reliable thermostat operation and prevents potential issues with your HVAC system. If uncertain, consulting a professional is recommended to avoid complications.

Setting Up the Thermostat
After installation, set the time and date on the thermostat. Select temperature units (Fahrenheit or Celsius) and choose between heating or cooling modes. Program schedules and preferences to optimize energy usage and comfort.
5.1 Programming the Schedule
Programming the T4 Pro schedule involves setting specific temperature levels for different times of the day and week. Users can customize up to six daily periods, adjusting the temperature to suit their lifestyle. For weekdays, set consistent wake, leave, return, and sleep times. On weekends, create a separate schedule for flexibility. The thermostat allows for both heating and cooling settings, ensuring optimal comfort. Use the touchscreen interface to navigate through the menu, selecting the desired days and times. Save your preferences to activate the schedule. This feature helps in reducing energy consumption by automating temperature adjustments when the home is unoccupied or during sleep hours. Regular updates to the schedule can further enhance efficiency and comfort.
5.2 Setting the Temperature
To set the temperature on the T4 Pro, navigate to the main menu and select the temperature control option. Use the touchscreen to adjust the setpoint by sliding your finger up or down. The thermostat displays the current temperature and the setpoint simultaneously. For heating, set the desired temperature between 40°F and 90°F, and for cooling, between 50°F and 99°F. The system also features a “Hold” function, which allows you to override the schedule and maintain a constant temperature. To activate this, press and hold the temperature adjustment button until “Hold” appears on the screen. This feature is ideal for temporary adjustments without altering the programmed schedule. Always ensure the thermostat is in the correct mode (Heat, Cool, or Auto) for accurate temperature control.

Advanced Features
The T4 Pro offers energy-saving modes and smart home integration, enhancing efficiency and convenience. These features optimize energy use and allow seamless control through compatible smart systems.
6.1 Energy-Saving Modes
The T4 Pro features advanced energy-saving modes designed to reduce consumption without compromising comfort. These include an energy-saving mode that adjusts temperature settings when the system is inactive, and a programmable schedule that learns your preferences to optimize energy use. Additionally, the thermostat offers smart recovery, which gradually adjusts the temperature to meet your setpoint just before your programmed schedule resumes. These modes work seamlessly with the thermostat’s smart home integration, allowing you to monitor and control energy usage remotely through compatible smart devices. By utilizing these features, users can significantly lower their energy bills while maintaining a comfortable environment year-round.
6.2 Smart Home Integration
The T4 Pro seamlessly integrates with popular smart home systems, enhancing convenience and energy efficiency. Compatible with Amazon Alexa and Google Home, users can control temperature settings via voice commands or through dedicated apps. This feature allows for effortless scheduling, remote adjustments, and energy monitoring. Additionally, the thermostat supports geofencing technology, which adjusts temperatures based on your location, ensuring energy savings when you’re away. Smart home integration also enables advanced features like automated scenes and routines, further personalizing your comfort experience. By connecting your T4 Pro to a smart home ecosystem, you gain greater control and insights, making it easier to optimize your home’s climate while reducing energy consumption.

Troubleshooting Common Issues
Identify and resolve common problems like display not turning on or incorrect temperature readings. Follow step-by-step solutions to ensure proper functionality and optimal performance of your T4 Pro thermostat.
7.1 Identifying Common Problems
Common issues with the T4 Pro Thermostat include the display not turning on, incorrect temperature readings, or unresponsive controls. These problems often arise from loose wiring connections or improper installation. Additionally, issues like uneven heating or cooling may indicate sensor malfunctions. It’s essential to check the circuit breaker and ensure the thermostat is receiving power. If the display remains blank, verify that the batteries are installed correctly and not depleted. For temperature inaccuracies, recalibrate the thermostat by following the manufacturer’s instructions. Addressing these issues promptly ensures optimal performance and energy efficiency. Always refer to the user manual for specific troubleshooting steps before seeking professional assistance. Regular maintenance can also help prevent recurring problems.
7.2 Resetting the Thermostat
Resetting the T4 Pro Thermostat can resolve various issues such as unresponsiveness or incorrect settings. To reset, first, ensure the power is off at the breaker. Remove the batteries and press and hold the “Menu” and “Back” buttons simultaneously for 5 seconds. This clears the stored settings. Reinsert the batteries and allow the thermostat to restart. If the issue persists, switch the Rc terminal to the “Off” position and wait 30 seconds before turning it back on. This process restores factory defaults and ensures proper operation. Always refer to the user manual for specific reset procedures, as methods may vary slightly depending on the model. Regular resets can help maintain optimal performance and prevent recurring problems. This step is crucial for troubleshooting and ensuring the thermostat functions correctly after installation or updates.
Maintenance and Upkeep
Regularly clean the thermostat’s surface and check wiring connections to ensure optimal performance. Replace batteries every 12 months or when low-battery alerts appear. Schedule annual professional inspections to maintain efficiency and address potential issues early. Ensure the UWP mounting system remains secure and level. Perform firmware updates as recommended by the manufacturer to access new features and improvements. Proper maintenance extends the lifespan of the thermostat and ensures reliable temperature control. Always refer to the user manual for specific maintenance guidelines tailored to the T4 Pro model. Consistent upkeep guarantees consistent performance and energy savings over time. Regular checks prevent unexpected malfunctions and ensure the system operates at peak efficiency. Maintain a clean and stable environment for the thermostat to function accurately. Use a soft cloth to wipe away dust and debris that may accumulate on the device. Avoid using harsh chemicals or abrasive materials that could damage the screen or components. Check the battery terminals for corrosion and clean them gently if necessary. Ensure the thermostat is level to maintain accurate temperature readings and functionality. Replace any worn-out parts promptly to prevent system failures. Keep the user manual handy for quick reference during maintenance tasks. By following these steps, you can ensure the T4 Pro Thermostat continues to provide reliable service and energy efficiency for years to come. Regular maintenance not only prolongs the device’s lifespan but also enhances its performance and accuracy. Stay proactive with upkeep to avoid costly repairs and downtime. The T4 Pro is designed for durability, but proper care is essential to maximize its capabilities. Schedule maintenance checks seasonally to adapt to changing conditions and ensure consistent heating and cooling. Use the manufacturer’s guidelines as a roadmap for all upkeep activities. This approach guarantees the thermostat remains efficient, accurate, and reliable in controlling your home’s temperature. Remember, a well-maintained thermostat is key to a comfortable and energy-efficient living space.
8.1 Cleaning the Thermostat
Regular cleaning of the T4 Pro Thermostat is essential to maintain its performance and accuracy. Use a soft, dry cloth to gently wipe the thermostat’s surface, removing dust and debris. Avoid harsh chemicals, abrasive materials, or electronic cleaners, as they may damage the screen or internal components. For tougher spots, lightly dampen the cloth with water, but ensure it is not soaking wet to prevent moisture damage. Pay special attention to the vents, buttons, and screen, as these areas tend to accumulate dust. Turn off the power at the breaker before cleaning to avoid any electrical issues. After cleaning, allow the device to air dry completely before restoring power. Cleaning ensures accurate temperature readings and smooth operation. Schedule this maintenance every 2-3 months or as needed to keep your thermostat functioning at its best.
8.2 Replacing Batteries
To replace the batteries in your T4 Pro Thermostat, start by turning off the power at the breaker box to ensure safety. Remove the thermostat from the wall plate if necessary, and locate the battery compartment on the back or bottom of the device. Open the compartment and carefully remove the old batteries. Insert two new AA alkaline batteries, making sure their polarity matches the markings inside the compartment. Close the battery compartment securely. Restore power to the thermostat and check its operation to ensure it is functioning correctly. Replace batteries every 12-18 months or when the battery indicator appears on the screen. Always dispose of old batteries properly and use high-quality replacements to maintain optimal performance. Avoid mixing old and new batteries to prevent power issues.

Additional Resources
The T4 Pro Programmable Thermostat provides comprehensive resources, including a detailed user manual, installation guides, and manufacturer support. Visit Honeywell’s website for troubleshooting tips and replacement information.
9.1 User Manual and Guides
The Honeywell T4 Pro Programmable Thermostat comes with a comprehensive user manual and installation guide, ensuring a smooth setup process. These resources provide step-by-step instructions for mounting, wiring, and programming the thermostat. Detailed diagrams and troubleshooting tips are included to address common issues. The manual also covers advanced features such as energy-saving modes and smart home integration. Additional guides are available online, offering in-depth information for both professionals and DIY enthusiasts. By referring to these materials, users can optimize their thermostat’s performance and ensure efficient temperature control. The guides are accessible on Honeywell’s official website, making it easy to resolve any installation or operational challenges.
9.2 Manufacturer Support
Honeywell provides comprehensive support for the T4 Pro Programmable Thermostat, ensuring users have access to assistance whenever needed. The manufacturer offers live chat with support agents, allowing for real-time troubleshooting and guidance. Additionally, Honeywell’s official website features extensive resources, including detailed manuals, installation guides, and FAQs. Users can also contact customer support via phone or email for personalized help. The T4 Pro’s support page includes videos and step-by-step instructions for advanced features like smart home integration. Honeywell’s commitment to customer satisfaction ensures that professionals and DIY enthusiasts alike can resolve issues efficiently. With robust manufacturer support, the T4 Pro delivers a seamless experience from installation to ongoing use.